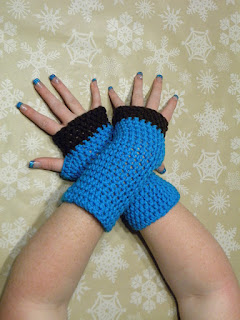
Basic Fingerless Gloves - Pattern
Every year, just before school starts, people start gearing up for back to school, and the upcoming crisp autumn weather. And year after year, my fingerless gloves are a hit.
I've been asked for a couple of years to write out my pattern, and I have.....in a since lost notebook.
I've decided to re-write it, and publish it for you to use! Enjoy!
You'll want to make 2 of these, this is a base, and you can switch colors as you see fit. I've used Red Heart With Love and a J (6mm) hook for these. They fit a teen or adult hand. You can adjust fit by adding or subtracting 2 stitches from the start chain. All other directions will remain the same.
You'll need to know how to chain, HDC, and HDC2Tog.
I'd say that this pattern is good for a confident beginner.
And here we go!
Chain 30, careful not to twist chain, sl st to the 1st chain.
Row 1) Ch 1 HDC in first 3 ch, HDC2Tog, HDC to end, sl st in first ch st.
Row 2-10) Repeat row 1.
Row 11-12) Ch 1, HDC in each HDC around, sl st to 1st Ch 1.
Row 13) Ch1, HDC in first 3 st. 2HDC in next 3 st, HDC to end, sl st in first ch.
Row 14) Ch 1, HDC in first 3, increase (2HDC) in each increase from row before, HDC in each regular stitch, HDC to end, sl st to first ch.
Row 15-16) Repeat row 14.
Row 17) Ch1, HDC in each stitch around.
Row 18) ch 1, HDC in first 3 st. Now you'll be doing a spread HDC2Tog. You'll do the first step in the next stitch, skip 9 stitches, putting the 2nd half of the HDC2Tog in the 10th. This creates the thumb hole. HDC to end. St st in first ch.
Row 19-23) Ch 1, HDC in each stitch. Finish off, and weave in ends.
Embellish with buttons, beads, stripes, and novelty yarns as you see fit.
You may sell the items you create from this pattern, but if you sell online, please link back to this pattern. Give credit where credit is due. And NEVER sell the pattern, or share it as your own. This pattern is my property and I've spent several years perfecting it.
Thank you. Let me know how you like it, and share your creations with me by tagging me on instagram! (@lilylaneeclectic)


Comments
Post a Comment